Have you wanted to improve your email marketing but don’t know where to start?
You know they are not doing as well as they could or as well as you would like them to, but how do you fix that?
Where do you start? How can you tell what your audiences like? And how can you learn what you should change to get your emails to perform better?
SPLIT Testing Is the Answer
Split testing, also called A/B testing, helps you answer these questions. You can try out different designs, words, and even offers to find the one that will give you the best results.
Best of all, HubSpot automates the whole process for you. You don’t need to send emails to people manually, waiting to see how they perform.
This guide will show you how to use HubSpot to split-test your marketing emails. You can learn all the steps to setting up your first A/B test.
We will go step by step so you can do it yourself, even if you’re a newbie to the software!
PS: We have also thrown in some pretty good pro tips here! Look out for them to learn something extra about using the HubSpot software for email marketing.
HubSpot Email Marketing A/B Testing: Where to Start
Step 1:
Log into your HubSpot Portal.
Go to ‘Marketing’ which you’ll find on the menu at the top right side of your screen.
Click on ‘Email’ from the drop-down menu that appears.
This brings you to a new page. The page includes draft emails yet to be sent out and those scheduled to be sent.
On this page, navigate to the top right corner and click on the ‘Create Email’ button.
This brings up a dialogue box that prompts you to pick the email type you want to use.
Click on ‘Regular Email.’ Unlike the other options, the regular email lets you create a personalized email.
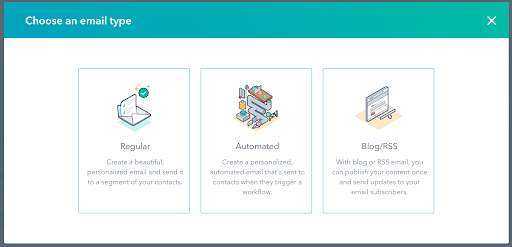
You can change the appearance of the email and its message so it suits your target audience better.
Quick Tip: You can always send a test email to yourself or team members to make sure it looks like you intended in your inbox.
Once you have clicked on ‘Regular Email,’ it leads you to a page with email templates that you can choose from. Any previously saved templates would also appear here.
At this point, pick one template to work with and click on it. You can change its design, maybe add your logo or a Call-to-Action Button, or work with it as it is.
Quick Tip: You can add your customized email as a template for future use. Just edit the email, and once done, click on the ‘Action’ button on the top right corner of the page and click on ‘Save as Template.’
HubSpot has some really cool drag-and-drop features where you can add CTA buttons, logos, and other graphics to the templates.
Quick Tip: Automate an email you have created by clicking on the same ‘Action’ Button and going with the ‘Convert to Automated’ option.
Setting Up the A/B Testing
While you have the email template open, navigate to the top left corner of your page, where you will find a ‘Run a Test’ option.
Click on this option.
It brings a pop-up that has several parts to it. Let’s look at what these parts mean and what to do for each:
Label Your Emails
The first part is where you name your emails to make them easily identifiable.
You may label them by their headlines and add an (A) and (B) to differentiate easily.
Pick Out a Preferred Distribution
The next part of the pop-up shows how the software will distribute the emails. And you can change it to your liking.
If you pick 25-25-50%, for instance, Email A would be sent to 25% of your audience, Email B to another 25%, and the software would pick the winning email and send it out to the last 50% of your subscribers.
So once you set it off, you would be able to sit back and wait for HubSpot to do its magic. It will do a tally, pick the winning email, and send it out to the rest of your email subscribers.
Let’s see how to determine the winning email.
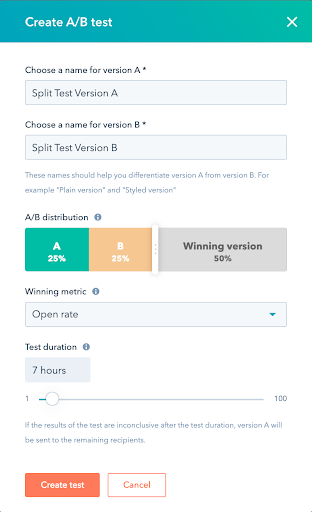
Pick the Winning Metric
The 3rd part of our A/B pop-up shows three different metrics that we can look at from our emails. The metric you pick is what HubSpot will use to determine the winning email.
- Open Rate refers to the total number of emails opened out of all the emails sent out. Picking this metric would tell the software to count how many emails of A and B are opened and declare the one opened the most as the winning email.
- Click Rate is the percentage of people who clicked on a link out of all the people you sent the email out to. It includes those that didn’t open the email as well.
- Click-Through Rate is the percentage of people who clicked on a link out of only those who opened your email. It excludes those who didn’t open the email.
When you are just starting, the Open Rate is a great place to start. It lets you see if people are even opening your emails in the first place.
You can then move on to tracking the click rates and click-through rates.
Test Duration
This last part of the A/B testing pop up is the duration you would like the test to run. A good rule of thumb to follow, as recommended by HubSpot, is to run the test for four hours or more.
For instance, if you picked four hours, the software would send out the first emails to some of your subscribers (Refer to Preferred Distribution to see how many of each email variation will be sent out).
After four hours, HubSpot will use the results to determine the winning email and send it to the rest of the email list.
Note: If the results aren’t conclusive or there’s a tie, HubSpot software automatically sends out the first email (Email A) to the rest of the email list.
Once you set up the duration, you can click on the ‘Create Test’ button at the bottom, and you will have the two emails to work with.
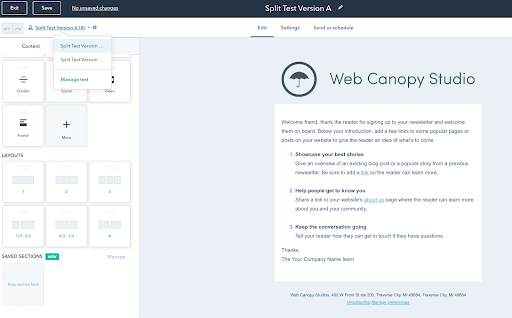
Creating the Email Contents
Now you have both emails and can add the different parts you want to test.
To add different headlines or subject lines, just open the ‘Settings’ on one email. Scroll to the heading or the subject line and change them.
You can easily switch between the two emails by clicking on the top-left corner of the screen where your email label appears.
What to Test on your Marketing Emails
There are lots of different things you could test on your emails. We’ll list a couple of them to get you started:
- Subject Line. This is the first thing that people will see, and it often determines whether or not they open an email.
- The Call-to-Action. You can change the wording or the appearance. For example, ‘Sign Up’ vs. ‘Join us Today!’
- Message Layout. You can change the email arrangement or design.
- Offer Type. You can test, for example, Ebook vs. white paper.
- Length of the Text. Test if your audience likes short emails vs. long emails.
There are more parts of a marketing email that you can test, but these offer an excellent place to start.
You can pick one and try different versions of it, keep tweaking until you find the combination that works for your audience.
Final Thoughts
Now you have the steps you need to set up your split test.
Market like the pros by using smart insights to send out marketing emails to your email list.
Set up A/B testing for your marketing emails and start to understand exactly what your audience prefers.


